Autoserve Customer Contract Import
Introduction
This will import Autoserve vehicles in to ViSN
download sample Autoserve customer contract import file.
File format
Comma Separated Values - *.csv
Encoding - UTF-8
Autoserve Customer Customers Import
| Autoserve Customer contract fields | Description | Max length | Data Type | Rules | Mandatory | Example |
|---|---|---|---|---|---|---|
| Customer | Customer Name | 100 | String | A-Z & 0-9 and Special Characters | Y | One Stop Auto Zone |
| Customer Account Number | Customer Account Number | 100 | String | A-Z & 0-9 and Special Characters | N | 88AX29UE39 |
| Registration | Vehicle Registration Number | 10 | String | A-Z 0-9 | Y | JJ05SAT |
| Vehicle Type | Vehicle Type | 20 | String | A-Z | Y | CAR |
| Make | Make of the vehicle | 20 | String | A-Z 0-9 and Special Characters | Y | Ford |
| Model | Model of the vehicle | 100 | String | A-Z 0-9 and Special Characters | Y | Escape |
| Specification | Variant | 100 | String | A-Z 0-9 and Special Characters | N | Manual transmission |
| StartDate | Vehicle Contract Start Date | 8 | String | DDMMYYYY | Y | 05051998 |
| ContractEndDate | Vehicle Contract End Date | 8 | String | DDMMYYYY | Y | 30102024 |
| ContractTypeName | Contract Type Name | NA | String | A-Z 0-9 and Special Characters | N | |
| ContractStatus | Vehicle Contract Status | 4 | String | A-Z | N | Active |
| Customer Reference | Asset Number | 20 | String | A-Z 0-9 | N | P10 |
| Mobile | Mobile Network Policy Status | 1 | String | Y/N | Y | N |
| Franchise | Franchise Network Policy Status | 1 | String | Y/N | Y | N |
| Independent | Independent Network Policy Status | 1 | String | Y/N | Y | N |
Importing a File
Preparation
- Create a new branch including the Jira task number in the branch name.
- Delete all files in the
importFilesfolder. - Create a folder with the current sprint number.
- Copy the file that needs to be imported to the created folder.
- Update
package.json:- Locate the line for
validate:autoServeCustomerContract. - Update
--leaseIdwith the required lease ID. - Update
--filewith the relative path of the file.
- Locate the line for
- Save
package.json.
Local Validation
- In a terminal, run
npm run build. - Run the validation script:
npm run validate:autoServeCustomerContract. - If validation passes without errors, push the code.
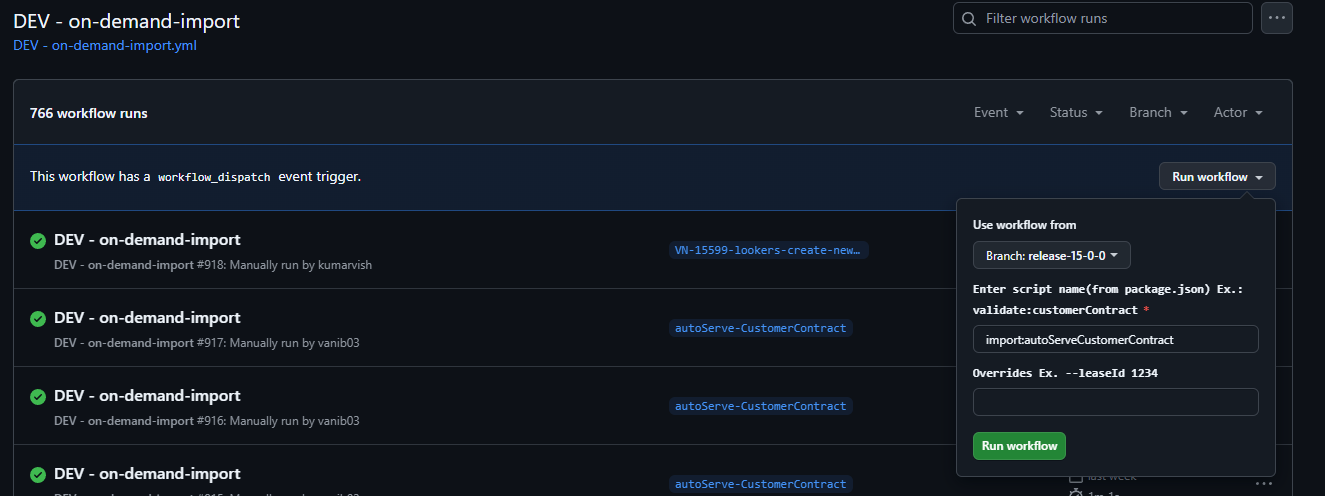
Workflow Validation
- Navigate to Actions in the Import Manager.
- Locate
<Environment> - on-demand-import. - Select the branch created for this import.
- Enter the script name as
validate:autoServeCustomerContract. - Leave the Overrides field empty.

Importing the File
- If the validation passes, proceed with the import.
- Navigate to Actions in the Import Manager.
- Locate
<Environment> - on-demand-import. - Select the branch created for this import.
- Enter the script name as
import:autoServeCustomerContract. - Enter
--persistin the Overrides field.

Importing the File via Cloud Run
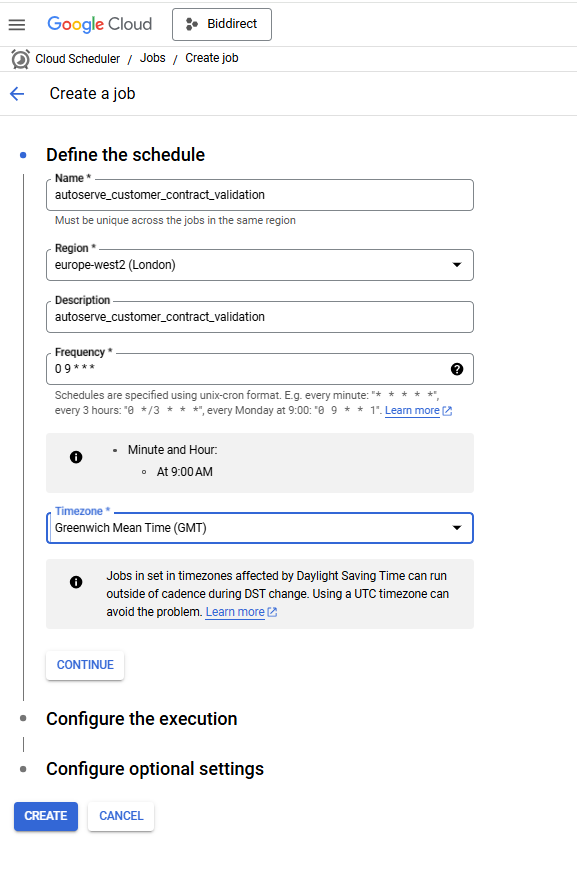
Creating Schedulers for Autoserve Customer Contract Validation
- Go to Cloud Scheduler and select CREATE JOB.
Scheduler Setup
Configure a Cloud Scheduler with the following parameters:
- Name: autoserve_customer_contract_validation
- Region: europe-west2
- Frequency:
0 0 31 12 1 - Time Zone: British Summer Time (BST)
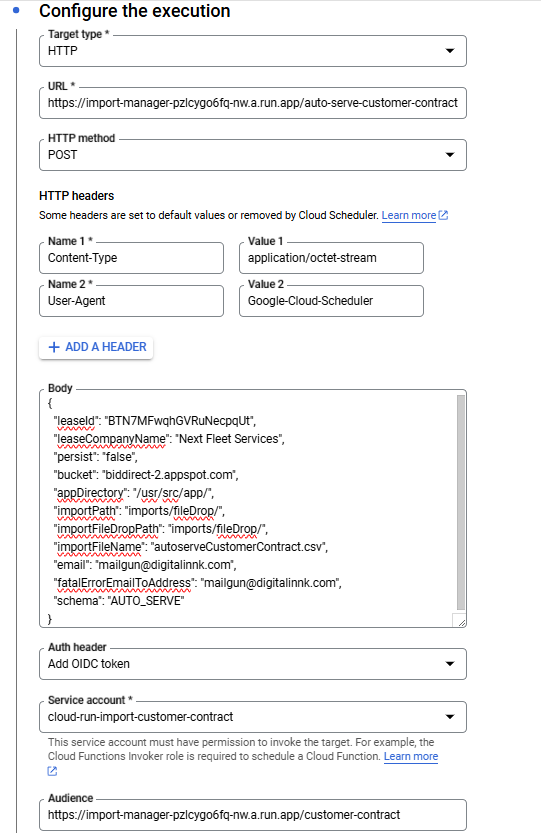
- Target Type: HTTP
- URL:
https://import-manager-36r2bu4izq-uc.a.run.app/auto-serve-customer-contract - HTTP Method: POST
- Auth Header: Select OIDC Token
- Service Account:
cloud-run-import-customer-contract - Body: Include the following JSON object:
{
  "leaseId": "QJKgdjS4I02sEia4yTne",
  "leaseCompanyName": "Next Fleet Services",
  "persist": "false",
  "bucket": "biddirect-2.appspot.com",
  "appDirectory": "/usr/src/app/",
  "importPath": "imports/fileDrop/",
  "importFileDropPath": "imports/fileDrop/",
  "importFileName": "autoserveCustomerContract.csv",
  "email": "mailgun@digitalinnk.com",
  "fatalErrorEmailToAddress": "mailgun@digitalinnk.com",
  "schema": "AUTO_SERVE"
}
Autoserve Customer Contract Scheduler Setup
This guide explains how to create Cloud Schedulers for validating and importing Autoserve customer contracts.
Creating Schedulers for Validating the Autoserve Customer Contract
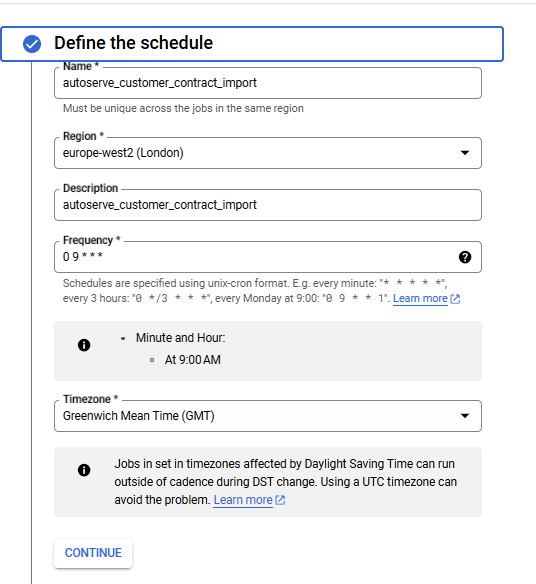
Steps to Create Scheduler for Importing Autoserve Customer Contract
- Go to Cloud Scheduler.
- Select CREATE JOB.
Required Setup
Configure the Cloud Scheduler with the following parameters:
- Name:
autoserve_customer_contract_import - Region:
europe-west2 - Frequency:
0 0 31 12 1 - TimeZone:
GMT London - Target type: HTTP
- URL:
https://import-manager-36r2bu4izq-uc.a.run.app/auto-serve-customer-contract - HTTP method: POST
- Auth header: Select
OIDC token - Service account:
cloud-run-import-customer-contract - Body: JSON object with the following parameters:
{
  "leaseId": "QJKgdjS4I02sEia4yTne",
  "leaseCompanyName": "Next Fleet Services",
  "persist": "true",
  "bucket": "biddirect-2.appspot.com",
  "appDirectory": "/usr/src/app/",
  "importPath": "imports/fileDrop/",
  "importFileDropPath": "imports/fileDrop/",
  "importFileName": "autoserveCustomerContract.csv",
  "email": "mailgun@digitalinnk.com",
  "fatalErrorEmailToAddress": "mailgun@digitalinnk.com",
  "schema": "AUTO_SERVE"
}
Autoserve Customer Contract Import Scheduler
This guide covers the steps to create and configure Cloud Schedulers for importing and validating Autoserve customer contracts.
Creating Scheduler for Importing Autoserve Customer Contract

Preparation
- Bucket Name:
biddirect-2.appspot.com(bucket name may vary across environments). - File Path: The file should be placed in
imports/fileDropwithin the bucket, using the CSV file named autoserveCustomerContract. Uploading to this path will place the file in the specified location within the designated bucket.

Validation
- Go to Cloud Scheduler.
- Run the
autoserve_customer_contract_validationjob (job name may vary in different environments).

Importing
- Go to Cloud Scheduler.
- Run the
autoserve_customer_contract_importjob (job name may vary in different environments).

Testing
- After running the import, verify that Autoserve vehicles have been successfully imported by navigating to the ViSN customer platform.
- Go to Vehicle Record and search for the imported vehicle to confirm the import process was successful.
Status: Accepted
Category: Protected
Authored By: Jeyakumar Arunagiri on Jan 14, 2025
Revisions